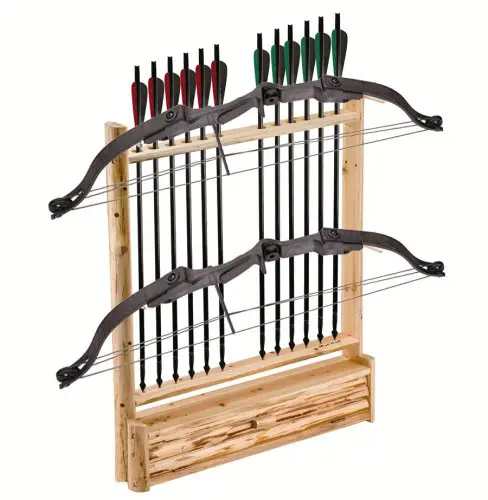
So we got a new recurve bow, great! Exciting! If we start shooting straight away what will happen? In a perfect world, the arrows will fly straight, true, and hit exactly where we want them to for every shot. We don’t live in a perfect world.
If we shot the bow after putting it together we may hit the target, but most likely, our arrows will move left or right, as well as up or down. They may even “wiggle” when they fly. So why are the bow and arrows acting like this?
Our bow is doing this because it is not tuned properly. You may have heard of this if you have watched any YouTube videos on archery or read any articles on archery. But how do we actually tune a bow? What does it entail?
First, like most things we need to start at the beginning. You need to add everything to the bow that you will be using. This means equipment like the arrow rest, plunger button, clicker, sight, and stabilizers. This is all put in place “approximately” to give us a starting point. Usually at a mid-point.
Tuning Nock Check
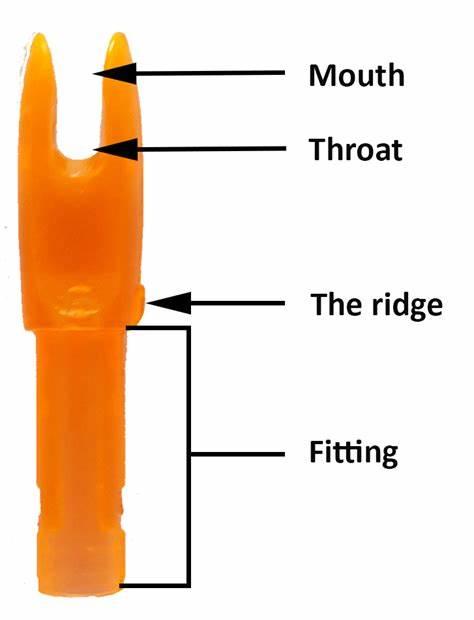
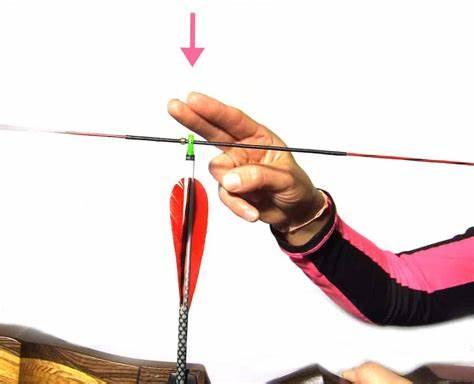
The first thing we need to check is the nock fit of the arrow on the string. Hopefully, your archery dealer will have sold you a good string where the center serving and the nocks on your arrows match. Surprisingly this can have a major effect on how the bow tunes.
Loose nock can move on the string and even fall off. Too tight and the nocks may become damaged and will need greater force for them to leave the string.
Indicators of good nock fit are:
The nock firmly clips onto the string with a crisp audible ‘click’. Next, the ‘ears’ of the nock slightly widen and then close back down as it clips onto the string. When you rotate the nock around the string, it doesn’t grab and rotate the string with it. The nock can’t move a large amount back and forth when it’s clipped to the string. A very slight amount of play is ok. And finally, you can displace a hanging arrow from the string with a firm tap a couple of inches from the nock.
Tuning Recurve bow Draw Weight
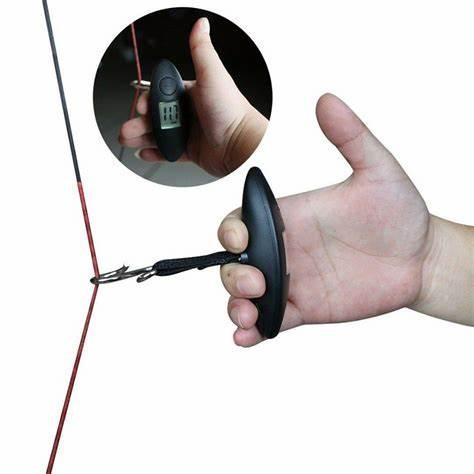
The next part of tuning is checking the “poundage” or draw weight of your bow. To work out the bows draw weight you need a bow scale of some sort (luggage scales work well for this). Draw the arrow until the clicker, clicks and read off. Do this three times to get an average, and you have your draw weight.
This can be adjusted by moving your limb bolts in or out. The number of turns you get on the limb blots varies between manufactures, so always refer to the manufactures handbook for this. Having the limb bolts in or out too far may cause damage to the limbs and be potentially dangerous. It is always best to have them as close to the middle position as possible.

Brace Height and Tiller
The final part of the initial setup is setting the bows brace height and tiller. Again, this will change between bow manufacturers. Each bow (riser) will have a range of brace heights that they are designed to run at.
The most common definition of “Brace Height” is the distance between the string and the deepest part of the grip, but I have also seen it described as the distance between the string and center of the plunger buttonhole. Either way, check with the bow manual and set the brace height to around the mid-distance recommended as a good starting point.
It may well change when we fine-tune, but this is a good place to start.

Checking the tiller is similar but you are checking the distance between the string and where the limbs enter the limb pockets. When measuring, the general rule is to have the top tiller greater by 1/8” (3.1mm).
This is the starting point and may change as you fine-tune the bow. Changing the tiller is achieved by moving a limb bolt in or out. The main function of the tiller is to allow the archer to more easily and comfortably aim during the draw and release of the shot.
Aligning your recurve Bow
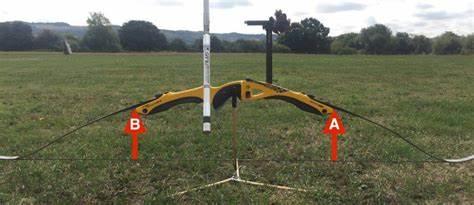
Our bow is now together, and we have the correct size string for our nocks, brace height, and tiller set. Next, we need to ensure the bow is aligned. This means we need to check that there is no twist to the limbs in the pockets allowing the bow to shoot straight, as well as the limbs not being in the center of the limb pocket.
For this we require some limb alignment tools that clip onto the limbs, allowing the archer to check if the string is running perfectly straight between the limb tips.

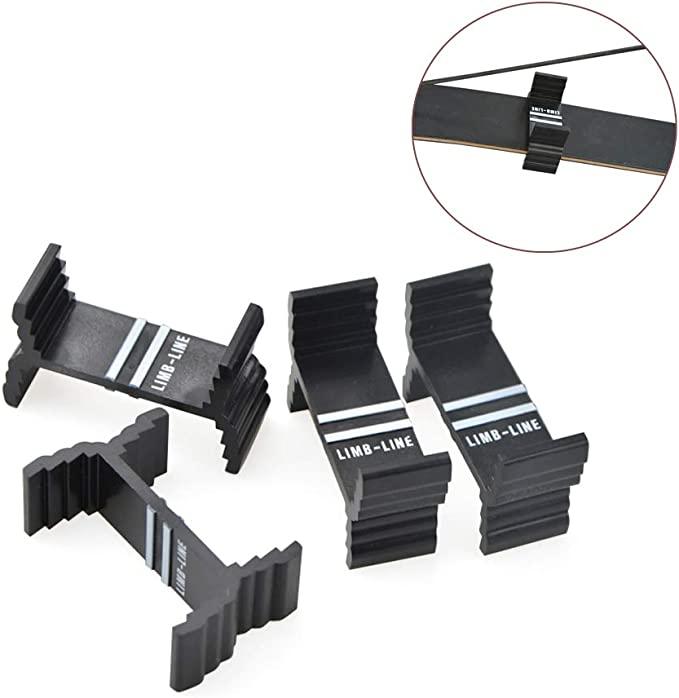
Most risers, including cheaper versions, allow for limb alignment left and right. On some newer risers, not only do you get left and right alignment, but they also allow you to adjust for limb twists as well. Always refer to your bow manual when adjusting limb pockets to align the limbs.

Centre Shot, Arrow Rest and Plunger
We have done lots to the bow already, but we still have some way to go before we can shoot our arrows. Next in the tuning setup is setting the center shot.
Table could not be displayed.Due to how a recurve bow shoots an arrow, placing the arrow directly in the center of the riser, will not work and the arrow will most probably hit the riser when shot, as the arrow bends around the riser. This is called the “archers paradox”.
To put it simply, the archer paradox is with recurve bows, when you shoot an arrow, it will “bend” around the riser. The amount of bend the arrow has will be discussed a little later on but setting the center shot is the start of overcoming this. It is also done in combination with setting the arrow rest.
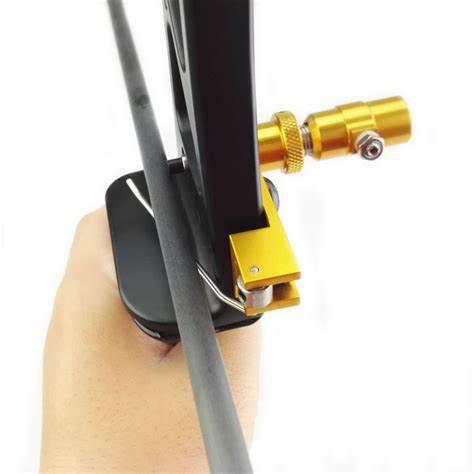
We put the plunger button in the hole and screw it through. The arrow rest holds our arrows at a point where the center of the arrow is in line with the center of the plunger button. The button should be set at the mid position and center shot is set, when looking from behind the bow the tip of the arrow is set slightly to the left of the string.


tuning your bows Nocking Point
Now we need to set a nocking point. The again may change when we start to shoot and tune the bow. Once again you need to reference the user manual for the bow. It will give you a point at which to place the bottom nock.
Table could not be displayed.Using your bow square (if you don’t have one it’s worth the $10 investment), clip it onto the string and rest the bottom of the square on the arrow rest. Measure up the distance in the manual, and place your nocking point. It may be tied on or crimped on. When you start shooting this may move up or down.


Tuning Recurve Bow Stabilizers
As we are attaching everything to the bow, now is a good time to attach the stabilizer setup we will be using. Many recurve bow archers don’t use stabilizers at all, is it’s considered a more advanced tool for those really looking to maximize accuracy.
For beginners, you may only use a single long rod, that attaches to the front of your bow. If you have purchased a full set or are progressing, you will have a long rod with two side rods as well.
Table could not be displayed.Ensure that when you attach the stabilizers, they are tight and cannot come loose. You may have extra weights added to the ends of the stabilizers as well as rubber dampers. Make sure that your setup is not too heavy for you to shoot. If they are, decrease the weight and work up gradually.
For tuning, use a weight that you are happy with and can shoot consistently. Another thing to remember is, if you have an adjustable V-bar, make sure your stabilizer does not encroach on archers that could be next to you. Remember you have a space of 800mm to shoot within during a competition.


Tuning your Recurve Bow Sight
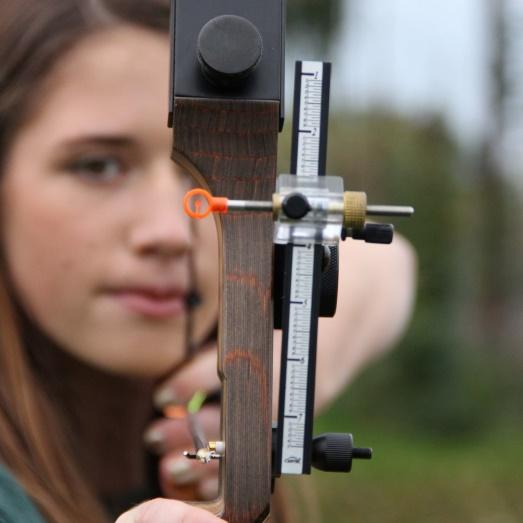
The last thing we need to do before we shoot the bow is to set the sight on the bow at a starting position. This may depend on where you are in the world and who your coach is when it comes to a sight picture. However, the most common starting position is with the sight pin’s right edge in line with the string as you look from behind. Also, as we start tuning at close distance, the sight pin needs to be near the top of the sight.
Arrow Spine: How it affects your shot
To shoot well, we need to make sure that we have the correct equipment. This means we need to make sure that the arrows we are shooting are matched to the draw weight of the bow. This is where the spine of the arrow is important. The arrow spine is defined as how stiff or flexible an arrow is.
How can we make sure we get this right? Each of the arrow manufacturers produces their own arrow charts which give guidelines on what spine arrow to shoot at what draw weight.

By adjusting arrow length, point, and nock end weight, the spine of the arrows can be changed to help with bow tuning. Working out the correct arrow spine and what the spine actually is, is a whole discussion on its own.
Shooting Fletched and Bare Shaft Arrows
Let’s start shooting. Hopefully, you have good technique and can shoot with a consistent form. We start at close range. I usually start at 5m (16ft). At this distance, you are unlikely to miss the target.
Remember to put your sight pin near the top of the sliding scale. You can always get someone to check to make sure you are going to hit the target. Start by shooting fletched arrows. See where the arrows are hitting, but for these first shots, listen to your bow and see how it feels. How does it sound?
Is it making a loud noise when shot or is it quiet? Does it vibrate a lot? Arrows that are heavy will make the bow quieter, and also changing the brace height will increase or reduce the noise of the bow. Find a point that you like and leave it there.
Once you have the brace height set and shot some more fletched arrows at 5m, shoot an un-fletched arrow and see where it hits. This is the start of bare shaft tuning.
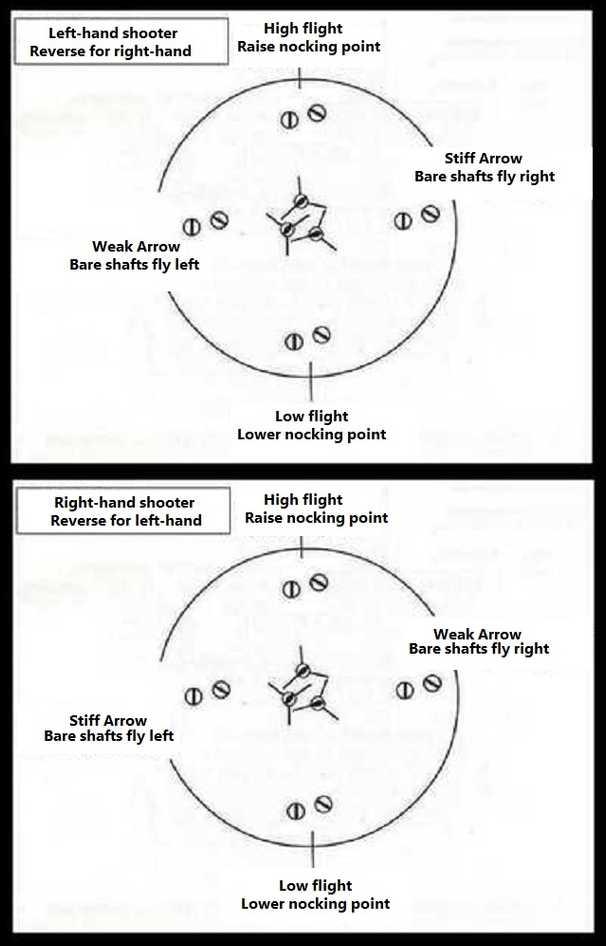
If the bare shaft arrow hit high you need to raise the nocking point. If it hits low you need to lower the nocking point. Bare shaft arrow hitting to the right of the fletched group, it is showing that your arrow is shooting weak and if it hit to the left, then it is showing stiff. What we are discussing here is for a right-handed archer (holds bow in left hand). For a left-handed archer, the nocking point indication is the same but the weak and stiff indication side is the opposite.
Depending on how far the bare shaft arrow hits away from the fletched group, the actions you need to take to rectify it will differ.
If the distance between them is large then you really have two options. First, change the arrows for a spine that will work with the draw weight. The second is to alter the draw weight by adjusting the limb bolts. If you cannot change the draw weight enough, new limbs may be needed. This is the most radical change you would do, but you need to match the arrow spines and draw weight so the bare shaft hits close to the fletched group.
If there is a small distance between the bare shaft and fletched group, another way to match the arrows and draw weight can be used. This may be done by adjusting the limb bolts to increase or decrease the draw weight, changing the points in the arrows, or adjusting the spring tension of the plunger. Each of these methods will help tune the bow, however, only do one change at a time, and always check the results prior to conducting any further adjustments.
As you can see, there are so many things that can mess with the tune of the bow. If we look closer at the above three methods, what are we actually doing?
By moving the limb bolts in and out, we can adjust the draw weight of the bow by about -/+ 10% (depending on the bow manufacturer). This can help with both weak and stiff arrows and bring the bare shaft into line with the fletched group. One thing to remember, make sure that if you need to increase the draw weight, can you actually draw the bow consistently and not cause any damage to you.
By changing the point weight of the arrow, you can change the characteristics of the arrow. By removing point weight you can stiffen the arrow, and by adding more point weight, the arrow can be made weaker. If you add more weight at the rear end of the arrow, you can also make the arrow weaker as well. This is just a “rule of thumb” as some heavier points are quite long and their shaft, which fits inside the arrow shaft, may stiffen the arrow, as much as its extra weight will weaken it.
By increasing or decreasing the plunger spring tension you can also move the bare shaft, as shown in the diagram below.

Once you are happy with where the bare shaft is hitting at 5m, move back to 10m and do the same. By moving back, any weakness or stiffness of the arrows compared to the draw weight will be magnified. Carry on doing this tuning at 5m intervals up until 30m / 32 yards. When you do shoot, not only look at where the arrows hit but also at how the arrows fly.
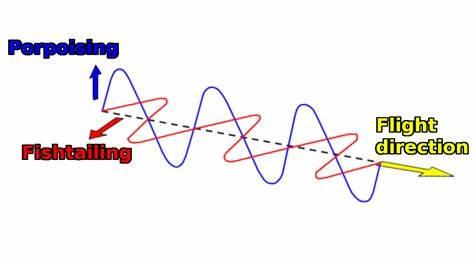
Arrow Flight
When looking at the flight of the arrow, you may see the arrow move from side to side. We call this “fishtailing” due to the arrow looking like what a fish does to move forward. This is not good and causes inconsistency. Some of the main reasons are:
- Incorrect tuning.
- Creating excessive pressure on the strings. Pulling it with more pressure.
- Sometimes mistakenly assuming the wobbling of the arrow.
- Careless release of an arrow.
- Hand torque.
- Arrow spine match.
- Centre shot off
Another thing to look for is the arrow moving up and down. This is called proposing, named after the movement of a porpoise. The main reason for this is the nocking point in the wrong position. Watching where the bare shaft arrow hits compared to the fletched group will tell you which way to move the nocking point.
Remember, the initial bare shaft reaction is what we want to observe to tell us about the tuning.
BARESHAFT IMPACT ANGLE: Use close range of up to 10m to read the bare shaft impact angle of the arrow to tell you about arrow spine. Between 10m-30m if the position of the bare shaft matches the position of the fletched arrows, the impact angle should only be used as a check of center shot, not of the arrow tuning.
BARESHAFT POSITION: Between 10m-30m use the bare shaft position relative to fletched position to tell you about arrow spine.
BARESHAFT FLIGHT ANGLE: Between 10m-30m use the FIRST reaction of the arrow flight after the arrow leaves the bow to tell you about the arrow spine.
Paper Tuning. Do we do it for a Recurve Bow?
What we have done up to now is basic recurve bow tuning. This will get us to a position where we have matched our arrows to the bow draw weight. We are grouping well and consistently. However, some people may be saying, “where is the paper tuning”.
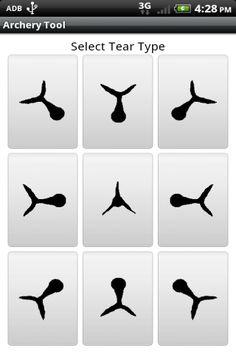
Paper tuning is where you shoot an arrow through a piece of paper and the way the arrow passes through the paper will indicate the tune of the bow. This works well with a compound bow but you need to remember the “archers paradox” when it comes to recurve bows. So what is Archers Paradox?
It’s the fact that a recurve bow blocks the target that you are aiming at, with its grip or arrow rest. So when an arrow is let loose, it is facing in a different direction from the target itself, yet hits it if the archer is skilled enough. This means the arrow actually bends around the riser on its journey to the target. An arrow from a recurve bow will always bend a bit (excessive bending as we know is called fishtailing).
So if we shoot through paper we will most probably get a tear either one way or the other, depending on how far the paper is from the bow. For basic recurve tuning I would not recommend paper tuning.
From my own experience, I have found tuning to be one of two things. Easy, or totally exasperating. I have had expensive arrows (Easton X10) that I have not been able to bare shaft tune, no matter what I did. I still shot them because they grouped really well, even at 70m.
Group tuning can work. All you need to do is shoot the bow at all distances you will need to shoot, and if you can shoot great groups consistently, just go with it and don’t worry too much about other types of tuning.
I have also shot cheap Skylon arrows of the same spine and diameter as the Easton X10s, and they tuned straight out the packet with virtually no adjustments. I have also found skinny arrows (0.166”/4.1mm or less in diameter) easier to tune than the thick, indoor arrow.
Yes, thick arrows help with line cutters, but I now use my outdoor arrows for indoors as they shoot so well. There are plenty of archers that use large shaft arrows, so always try everything you can before you make your own decision.
Tuning your bow doesn’t finish there. Micro adjustments of everything we have already adjusted and continually recording how the bow shoots, including the sound it makes, allow you to keep improving the bow as you become more consistent.
Final Thoughts – Tuning Your Recurve Bow
One thing to remember when shooting is if you shoot one day and everything is good, but the next day the arrows are hitting a different position, may not mean your bow is out of tune, it could just be a different lighting situation.
I shot 18m outdoors one day, then 18m indoors the next and my arrows were still grouping well but all were hitting to the left on the second day. This was due to different lighting. This can happen at different times of the day due to where the sun is in the sky.
Another tip is when you have a brace height and tiller set, write down what the measurements are. Check the brace height and tiller whenever you shoot to ensure nothing has moved, and check everything is still tight on the bow. Always remember, outside influences can and will affect where your arrows hit.
Archery is my hobby & I usually hunt and play on weekends and after work. It’s a passion since I was very young and I love writing about it as well to continuously learn more and share the love of archery with others!